Router Setup
Mikrotik WireGuard Setup Guide
A MikroTik router with RouterOS v7 or later is required. WireGuard is not available in earlier versions.
Generating WireGuard config file
-
Navigate to our WireGuard config file generator page.
-
Click on the
Generate keybutton, choose the VPN server with the preferred settings. -
Download and extract the zip archive.
Configuring WireGuard interface and peer
-
Log in to your router’s web interface.
-
Navigate to
Files, click theUploadbutton and select extracted previously WireGuard config file.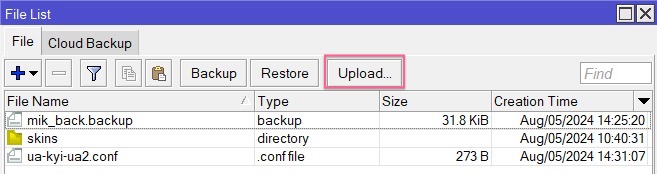
-
In the
WireGuardarea, click on theWG Importand select the uploaded config file.
-
In the
Peerstab, double-click on the added Peer and enter the following configuration:- Name - give it any name, e.g., IVPN_Ukraine
- Interface - the name of your WireGuard interface, wg1 by default
- Endpoint - the IP address of the VPN server (located in the generated WG config file,
Endpointfield) - Port - the
Endpoint'sport, e.g., 2049 - Allowed Address - 0.0.0.0/0 and ::/0 below
- Persistent Keepalive - 25
- Client DNS - enter WireGuard’s regular DNS server IP address 172.16.0.1 or the one associated with the preferred AntiTracker list
-
Hit
ApplyandOkay.
-
Navigate to
IP-Addresses, click+and enter the following:- Address - the assigned WireGuard interface IP address (found in the generated WG config file,
Addressfield) - Interface - wg1
- Address - the assigned WireGuard interface IP address (found in the generated WG config file,
-
Hit
ApplyandOkay.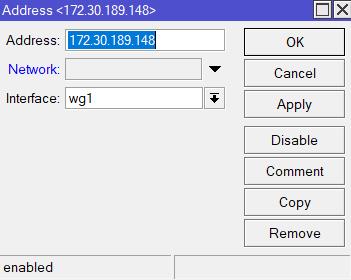
Configuring Routing and Firewall
-
Navigate to
Routing-Tables, click+to create a new table. Give it any name, e.g.WG-Table, check theFIBoption andApplythe changes.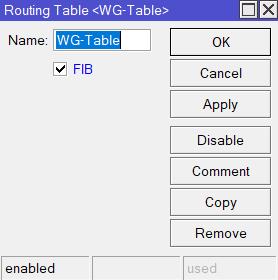
-
Navigate to
Routing-Rules, click+to allow communication between devices on your LAN — including access to the router itself:- Src. Address - the IP address of your local network, e.g., 10.0.0.0/24
- Dst. Address - 10.0.0.0/24
- Action - lookup
- Table - main
-
In the same section, click
+again to add a second routing rule that sends all remaining traffic through the WireGuard interface. Make sure this rule is positioned below the previous rule to ensure local traffic is handled correctly. Configure the rule with the following fields:- Src. Address - the IP address of your local network, e.g., 10.0.0.0/24
- Action - lookup only in table
- Table - WG-Table
-
Hit
ApplyandOkay.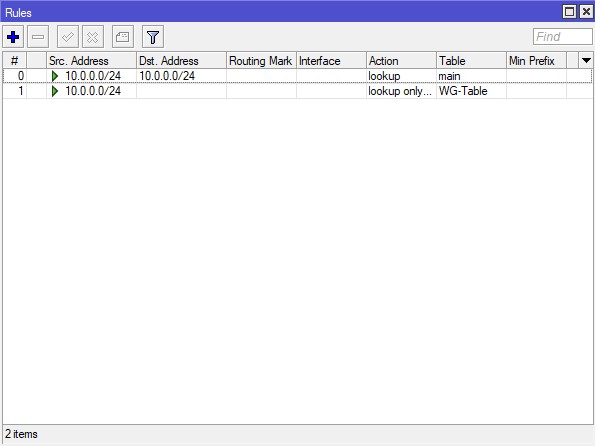
-
In
IP-Routes, click+to create a new route with the following configuration:- Dst.Address - 0.0.0.0/0
- Gateway - wg1
- Routing Table - WG-Table
-
Hit
ApplyandOkay.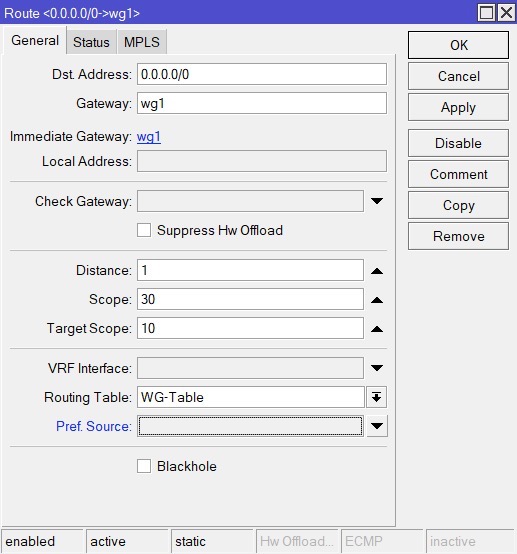
-
In
IP-Firewall-NATtab, click+and fill in the following:- Chain - srcnat
- Src. Address - the IP address of your local network, specified in step #2 (e.g. 10.0.0.0/24)
- Out. Interface - wg1
- Action tab Action - Masquerade
-
Hit
ApplyandOkay.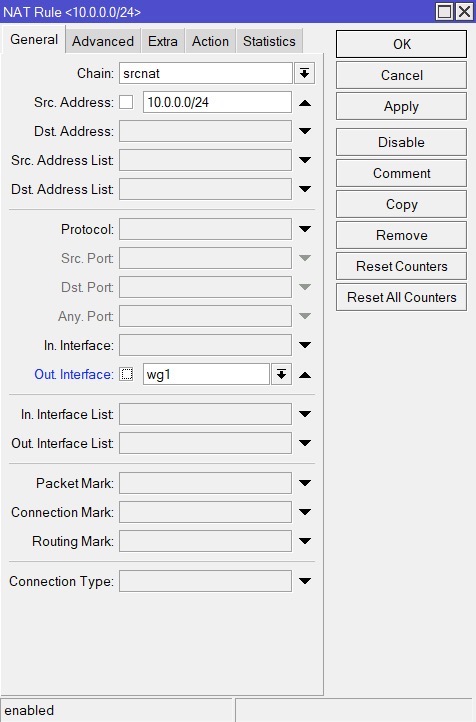
Configuring DNS
-
In
IP-DNS, enter WireGuard’s regular DNS server IP address (172.16.0.1) or the one associated with the preferred AntiTracker list into theServersfield and apply the changes. -
In
IP-DHCP Server, double-click on your local network and enter the same DNS IP address into theDNS Serversfield. -
Applythe changes.
Final Steps
-
Restart the router.
-
Check the connection status and the assigned public IP address on our website and run a DNS leak test at https://www.dnsleaktest.com from one of the devices connected to your Mikrotik router.