Self audit your VPN - Pt1. - Getting started
Misc
Solène Rapenne
While it is important to protect your privacy, it is also essential to trust your VPN provider with the proper implementation of its VPN service. While third-party audits by organisations can provide some assurance, it is possible to audit the VPN functionality independently. This series will teach you how to verify that your VPN is functioning as claimed by your VPN provider.
Verifying the functionality of your VPN is crucial for maintaining your privacy. While some VPN providers publish their apps in open source, not everyone has the time or expertise to thoroughly review them. The most straightforward way to validate your VPN is to analyze network traffic from various angles and ensure it’s connected to the intended server, on the correct port, and using the appropriate protocol. Additionally, it’s essential to identify any potential data leak. After this series, you will have the knowledge and confidence to assess your VPN configuration.
Network traffic analysis is an effective method for conducting a self-audit of your VPN. By reviewing the network activity, you can ensure that what you audit is actually occurring on the network.
In this initial section, you will gain an understanding of the tools you will utilize throughout the series, as well as some methodologies that will be pertinent in certain audit scenarios.
Self audit method
For this series, you will use the software Wireshark which is the industry standard for capturing and analyzing network packets.
Wireshark is compatible with most operating systems including Windows, macOS, Linux and *BSD. It has the capability to identify known protocols, limit displayed packets with advanced filters, display TCP by sessions, render packets content and much more.
Although it is not available on mobile devices, we will provide a method for analyzing network traffic on mobile devices. Wireshark is a graphical application that is not intended for use on remote headless systems. The guides will also cover how to achieve traffic analysis of remote systems.
Wireshark usage
This section will teach you the basics of Wireshark, so you can use it for the series. If you want to learn more about Wireshark features, you are encouraged to look at its documentation.
Quick setup
Windows
In order to install Wireshark on Windows, visit the Downloads page and download the file that suits your system best. If you do not know which one you need, download the file “Windows x64 Installer”.
Run the installer and follow the instructions. Windows requires an extra specific installation step to install a component named “Npcap”, this is required on Windows to capture packets - it is safe to install.
macOS
In order to install Wireshark on macOS, visit the Downloads page and download the file matching your CPU architecture, if your device CPU name looks like M1, M2, etc., you need the file “arm disk image”. If your device is a previous model, download the file “Intel disk image”.
Linux
On most Linux distributions, Wireshark is available in the package manager. Refer to your distribution documentation to learn how to install the Wireshark package.
Depending on your distribution, you will either need to run Wireshark using sudo, or add your user to a group named wireguard before restart your desktop session.
How to start capturing packets
When running Wireshark, below the text “Capture… using this filter” and a text input field, you will find all your network interfaces, if you double-click on an interface, the packet capture will start.
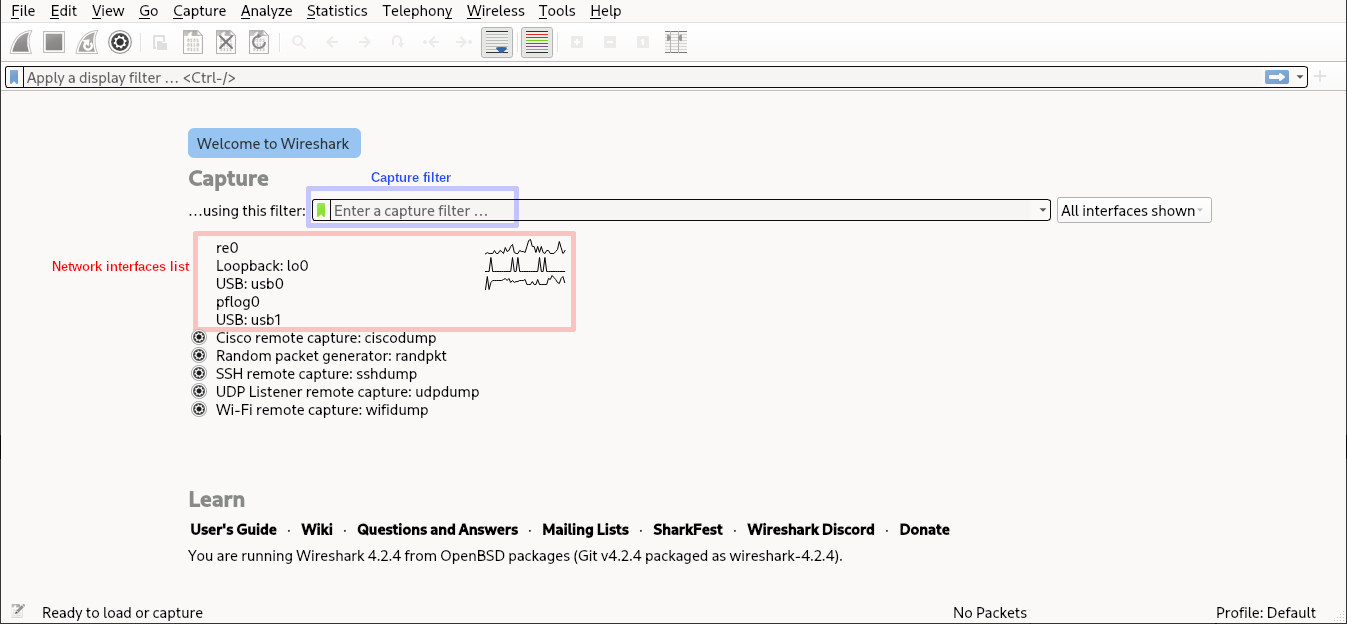
Filters
There are two kinds of filters in Wireshark: capture filters and display filters, they use a different syntax.
When you know exactly what you want to capture, it is better to use a capture filter to make the capture dataset smaller. When you want to explore the network traffic like you will do in this series, you will need all data in the capture then dynamically filter the display.
Wireshark offers auto-completion while typing a filter, which makes life easier when searching for one. The documentation contains common examples of display filters. Do not worry if you do not understand the filters syntax or what they mean at this point. The guides will provide filters and explanations about what they do.
Network capture of remote devices
In some cases, you may not be able to run Wireshark on the device you want to audit.
The most common cases are IoT devices, smartphones and headless machines (routers, servers). Methods to capture traffic on these devices while keeping the analysis procedure identical to the case where Wireshark is running locally are explained below.
Wi-Fi devices / Smartphones network traffic capture
If you need to capture the network traffic of a smartphone or any IoT devices using Wi-Fi, there is a simple method which is compatible with most devices: set up a Wi-Fi hotspot network on a computer running Wireshark. The computer must have at least two network interfaces for this setup to work: one connected to the Internet and the other to allow connection from devices you want to monitor.
Once the hotspot is created, start capturing the network traffic of the Wi-Fi network interface in Wireshark. Then, connect the device you want to monitor to the new Wi-Fi access point.
This will allow you to check all the traffic going from / to the connected Wi-Fi devices without needing any special privileges or jailbreak to run the software like tcpdump which only work on rooted Android devices.
Check your operating system documentation to learn how to create a Wi-Fi hotspot sharing Internet:
- Windows documentation
- macOS documentation
- Linux: the network manager applet should provide a feature to create a Wi-Fi hotspot, or you can do it using the command line interface.
You can use an Ethernet connection instead of a wireless hotspot if your devices support Ethernet.
Capturing network traffic on headless machines
In order to analyze the network traffic passing through a headless server/router, you will need to use the software tcpdump on the remote system.
As tcpdump works in a terminal and its output might be challenging to read, you will only use it for capturing network data into a file on the remote machine, then retrieve the file to open it using Wireshark for a local analysis offline.
The program usage is simple: as the privileged user (root on Linux and *BSD), run the command tcpdump -i <interface> -s 65535 -w <file> where:
<interface>is the name of the network interface from which you want to capture the data.<file>is the output filename containing the data.
Wait at least two minutes to have a good sample of network traffic, then press Ctrl + C to stop the capture.
Note that <file> will contain all the data that went through <interface> during the capture. If you run the capture for a long time or that the network interface had a high bandwidth usage during the capture, the destination file size can be large.
Once you are done with the network capture, do not forget to retrieve the file on the computer where Wireshark will be used.
To open the capture file, start Wireshark and click on “File” and then on “Open”, select the file and click on the Open button.
Force Wireshark to decode packets using a given protocol
In order to identify the protocol used by network packets independently of its transport protocol port, you need to configure Wireshark to force using a given protocol to decode the packets.
This can be achieved using the following instructions:
- right-click on a packet
- click on “Decode as”
- a popup window with a single line should be displayed
- click on the last cell under the column “Current”
- choose the protocol required, you can type on the keyboard to jump to a letter in the protocol list
- click on “OK”
- the protocol in the display should have changed to the one you selected
This change will be discarded when exiting Wireshark.
Identify the VPN server IP
In the series, some scenarios will require you to know the IP of the server you are connected to. This section explains different methods to find this IP depending on your setup.
VPN configured without a provider App
If you do not use the app of your VPN provider, you can find the IP address of the server in the VPN configuration. It should have a name “Endpoint address” or similar. Only retain the IP address in case the field contains the VPN port.
Using the IVPN App
By default, the IVPN App does not display the servers IP or hostnames. A parameter must be enabled in the IVPN App settings to allow choosing a specific server instead of automatically choosing a random server when clicking on a country.
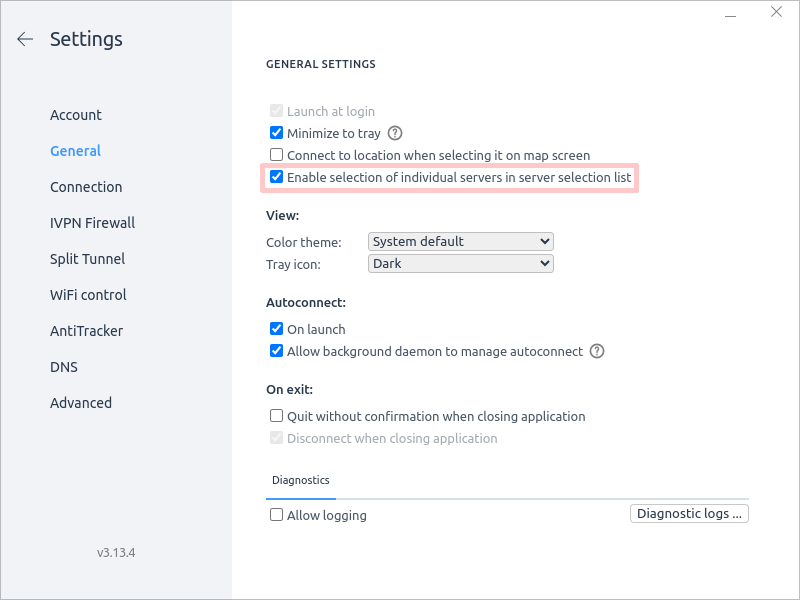
After you enabled this setting, in the server list you will be able to choose a specific server in the hostname list under country names. You need to write down the chosen hostname as you will need it for the next step.
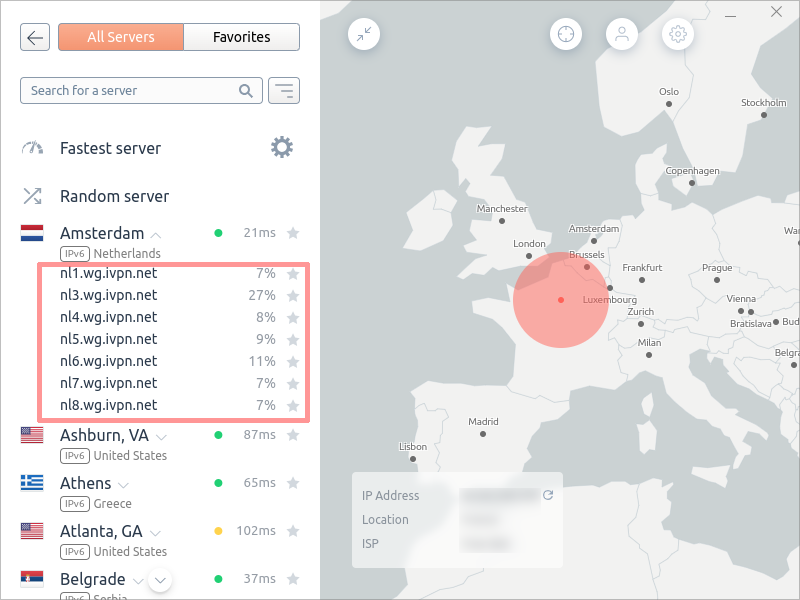
Now, you can either resolve the hostname to get the server IP address, or you can search the hostname in IVPN API server list and get the value of host related to the hostname.
If you prefer to resolve the hostname from the command line, on Microsoft Windows, Apple macOS and Linux systems, the command line program nslookup can be used to resolve a hostname into an IP address. Here is an example of nslookup use:
user@linux ~ $ nslookup gr1.wg.ivpn.net
Server:          9.9.9.9
Address:        9.9.9.9#53

Non-authoritative answer:
Name:   gr1.wg.ivpn.net
Address: 169.150.252.113
If you do not know how to use a command line program, you can use a DNS lookup tool: type the hostname and select the query type “A” to obtain the IPv4 address.
Identify the VPN server protocol and port
In the series, some scenarios will require you to know the protocol and the port used to connect to the remote VPN. This section explains different methods to find this information depending on your setup.
VPN configured without a provider App
If you do not use the app of your VPN provider, you can find the protocol and port used to establish the VPN in its configuration.
With WireGuard, it is always using the UDP protocol, the port can be found in the “Endpoint address” field of the configuration, after the server IP.
With OpenVPN, the protocol can be either TCP or UDP. Depending on the client used, you will find the port in a field which could be named “Gateway” or “Remote”, at the right of the server address. The protocol may be indicated on the same line, or on a dedicated line named “proto”.
Using the IVPN App
The protocol and port used to connect to the VPN server are shown on the App main interface. You can find this information in the bottom left corner.
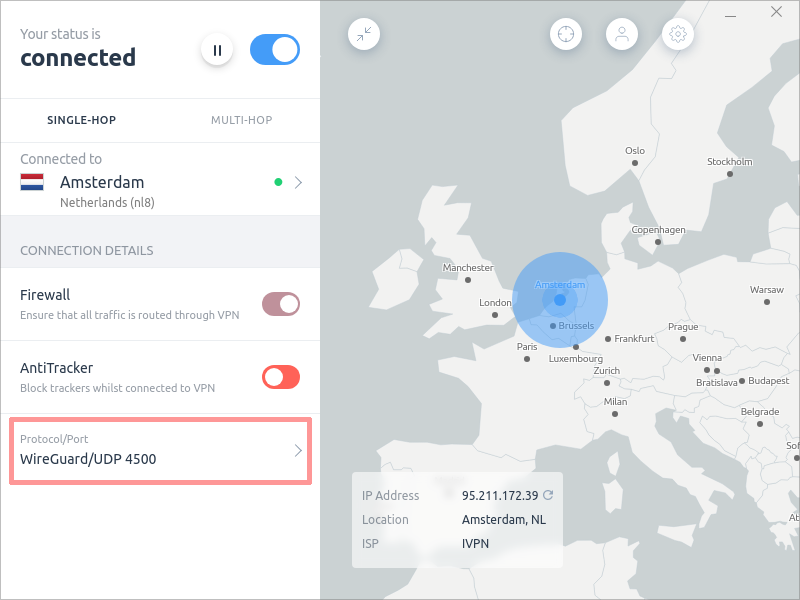
In the example above, the protocol is UDP and the port number is 4500.
Next step
If you have read the guide until here, you are ready to continue the series covering WireGuard and OpenVPN.
Next Articles
- Self audit your VPN - Pt2. - WireGuard Configuration and Leaks
- Self audit your VPN - Pt3. - OpenVPN Configuration and Leaks
Here to learn?
Consult our guides for increasing your privacy and anonymity.
IVPN Privacy GuidesSuggest an edit on GitHub.