Self audit your VPN - Pt2. - WireGuard Configuration and Leaks
Misc
Solène Rapenne
This guide is part of a series that will show you how to self-audit a VPN tunnel for data leak.
The current guide is the part two and focuses on WireGuard.
This guide assumes you know the basics of Wireshark, covered in part one. If you need a refresher, please read part one before continuing.
How to verify if the network traffic is going through your WireGuard VPN tunnel
This section explains how to identify network traffic that does not pass through the VPN tunnel when it should, such case implies a VPN leak and a potential risk for your privacy. At the same time, you will be able to verify the WireGuard connection is established with the server of your choice.
The first step is to identify the IP address of the chosen server, protocol and port used by your VPN, you can refer to the first part of the series to learn how to find this information.
Using Wireshark, start capturing the network traffic on the physical interface connected to the Internet. Be careful to not capture the network traffic on the VPN interface otherwise the results will not be useful.
Use the following text into Wireshark display filter input, adapt the variables (written in capital letters): (ip or ipv6) and not (ip.addr == SERVER_IP and udp.port == SERVER_PORT) and not (icmpv6 or llmnr or dhcp or mdns) and not (ip.host matches ".255$" or ip.addr == 224.0.0.0/4). If your VPN is using V2Ray obfuscation using VMESS/TCP, you will need to replace udp.port by tcp.port.
Here is a detailed breakdown of this filter:
(ip or ipv6): match Internet Protocol (IPv4 and IPv6) packets. This discards other protocols such as ARP or Ethernet that are not relevant for the current scenario.not (ip.addr == SERVER_IP and udp.port == SERVER_PORT):not: match the opposite of the condition following it.ip.addr == SERVER_IP: matches all packets exchanged with the server with the address SERVER_IP.udp.port == SERVER_PORT: matches all packets exchanged on the UDP port SERVER_PORT.- The combination of the two will remove all UDP traffic from your VPN server on the VPN port, it hides all the VPN traffic from the display.
not (icmpv6 or llmnr or dhcp or mdns):not: match the opposite of the condition following it.(icmpv6 or llmnr or dhcp or mdns): contains a list of protocols.- The combination of the two removes the packets matching any protocol in the list. These protocols are not meant to be routed to the Internet and will not be carried over the VPN, so we filter them to not appear as false positives.
not (ip.host matches ".255$" or ip.addr == 224.0.0.0/4):not: match the opposite of the condition following it.ip.host matches ".255$": matches all IP addresses ending with255, those are multicast addresses.ip.addr == 224.0.0.0/4: matches IPv4 broadcast traffic.- The combination of the two removes all broadcast and multicast packets, they are not useful because they are not meant to be tunneled through a VPN, so we filter them to not appear as false positives.
This display filter restricts the display content to IP traffic that is not from your VPN and excludes a certain number of packets that are not routable.
Ideally, with this filter, you should not have lines in the Wireshark packet list (main display). If a line appears in the list, ask yourself the following questions:
- Is the VPN disconnected and my firewall not blocking non-VPN traffic as it should?
- Is this a local network (LAN) traffic? If both the source and destination IP belong to your LAN, it is LAN traffic and does not belong to a VPN tunnel.
- Does it occur regularly? If so, close all the programs on your computer and check if you see it again. If not, start the programs one by one until you see the pattern again, one of them may be bound to a configured network interface and bypass the VPN routing rules.
- What protocol is it? Is it expected? At this point, you will need to understand exactly what happens on your system.
- Are there multiple connected VPNs on my system? You may be auditing the one that is encapsulated in another VPN.
- Are SERVER_IP and SERVER_PORT correct?
Note, after switching to a different VPN server, you may see incoming packets from a previous server up to 3 minutes after disconnection. This is due to how WireGuard is designed (WireGuard paper: 6.3).
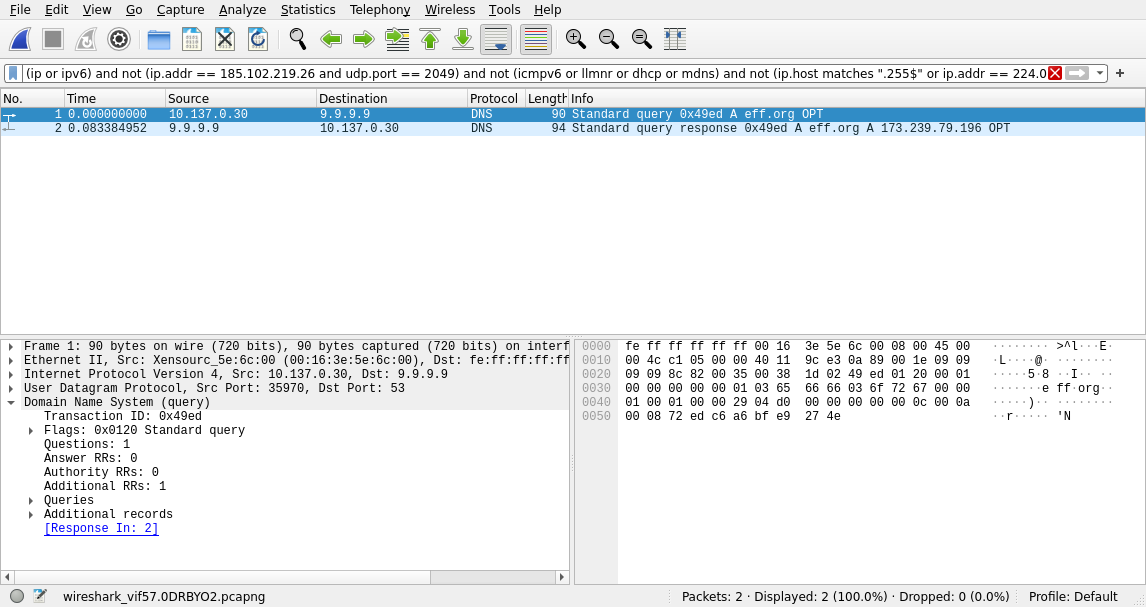
To illustrate this filter, here is a screenshot of Wireshark showing packets that did not go through a VPN. In the following Wireshark screenshot, you can identify a single DNS request that was not done through the WireGuard tunnel. This was done intentionally to illustrate the case of a packet not matching the filters.
The first line corresponds to my computer LAN IP 10.137.0.30 querying 9.9.9.9 DNS server about the domain eff.org. On the second line, the server 9.9.9.9 is replying to my computer with the query answer.
How to verify your system firewall effectiveness
In this scenario, you will learn how to ensure the system firewall is working effectively and blocking all traffic when the VPN is not connected.
In order to check the firewall, you will monitor the network transmitted from your computer to the Internet while the VPN is disconnected. If the firewall is properly configured, there should not be any data egress.
For this scenario, you need to find the IP of your computer on the local network, most of the time it looks like 192.168.y.x.
If you do not know how to find your computer local network IP, here are guides explaining how to do so:
Disconnect the VPN and make sure your firewall is enabled before continuing.
In Wireshark, start the capture on the non-VPN network interface and use the following display filter: ip and ip.src == YOUR_LAN_IP. This filter will limit the display to IP packets that correspond to your computer IP.
If you use IPv6, you need a different filter which must include all your IPv6 addresses in addition to your IPv4 address: (ip or ipv6) and (ip.src == YOUR_LAN_IPV4 or ipv6.src == YOUR_LAN_IPV6 or ipv6.src == YOUR_PUBLIC_IPV6) and not icmpv6. This filter will limit the display to IPv4 and IPv6 packets whose source is one of your IPs, and hide the ICMPv6 protocol generating a lot of local traffic.
While the capture is running, run programs needing a network connection like a web browser, email client or instant messaging software. They should not work and there should be no displayed lines in Wireshark either.
Now, if you establish the VPN connection, you should not see any change in the Wireshark display.
If you have lines displayed, this could mean that:
- the source IP may be allowed by the firewall
- your system firewall is misconfigured
- your VPN app software (if any) configuring the firewall is misconfigured
If you use the app of your VPN provider, you may see traffic related to the provider API, the app may have a setting to block this traffic. For instance, IVPN users may see network packets addressed to 198.50.177.220 or 2607:5300:203:1735::8 which are the addresses of the server api.ivpn.net (as of August 2024). By default, the IVPN app allows traffic to IVPN servers, but this behavior can be disabled in the app firewall settings.
How to verify V2Ray obfuscation is enabled
In this scenario, you will learn how to verify that WireGuard obfuscation V2Ray is working effectively. Obfuscation algorithms can disguise WireGuard packets as QUIC or HTTP traffic, making it much harder to identify as VPN traffic, even when observing it with deep packet inspection.
Both methods have a performance penalty and should only be used when you are not able to connect using a non-obfuscated WireGuard tunnel.
The first step is to identify the IP address of the chosen server, you can refer to the first part of the series to learn how to proceed. IVPN users will need to use the server list from the API to find the IP address on which the server is offering V2Ray.
V2Ray obfuscation (VMESS/QUIC)
Start the network traffic capture with Wireshark before enabling the VPN, then use the following filter: ip.addr == SERVER_IP and udp.port == SERVER_PORT, replace SERVER_IP and SERVER_PORT by your VPN server connection information.
This filter restricts the capture display to the packets exchanged with the VPN server. From there, you need to configure Wireshark to force decode packets using the QUIC protocol and see if it succeeds. In Wireshark, if the packets appear of protocol “QUIC” and the values in the column “Notes” are not all “Protected payload”, it means obfuscation is working.
The method to configure Wireshark to decode the packets as QUIC is explained in the first part of the series.
In Wireshark packets list, if the column “Info” displays “Protected Payload” for all packets. This indicates the packets are using WireGuard, but if you see most packets have the text “Retry” it means you are looking at QUIC packets and obfuscation is working.
Further verification can be done by looking at the protocol details on a packet, either at the bottom of the display or in a popup window by double-clicking on a packet.
A QUIC packet should look like the following picture, within “QUIC Connection information” there are some source and destination information.
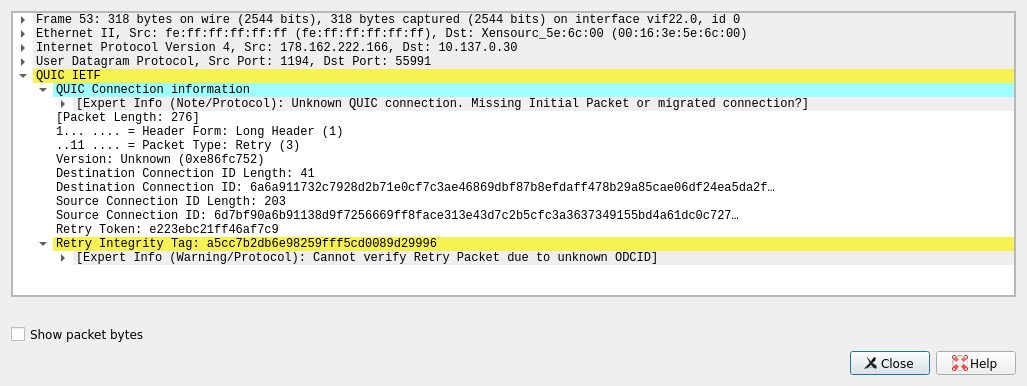
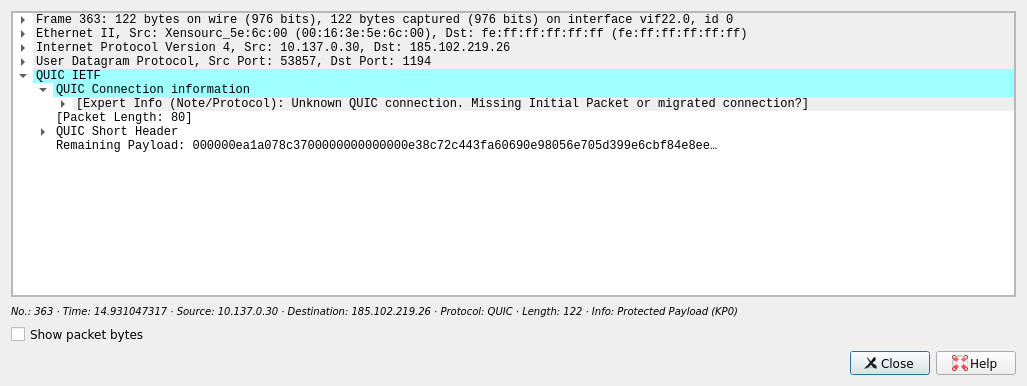
If the packet is a WireGuard packet, there will be no QUIC information.
V2Ray obfuscation (VMESS/TCP)
Start the network traffic capture with Wireshark before enabling the VPN, then use the following filter: ip.addr == SERVER_IP and tcp.port == SERVER_PORT and http, replace SERVER_IP and SERVER_PORT by your VPN server connection information.
This filter restricts the capture display to HTTP packets exchanged with the VPN server.
Now, right-click on a result line, choose Follow → TCP Stream, this will open a popup window showing the content of all the packets of this TCP session. As this is a plain text HTTP connection, you should see readable text at the top of the data. It should look roughly like the example below (exact format will depend on the obfuscation implementation):
GET / HTTP/1.1
Accept-Encoding: gzip, deflate
Connection: keep-alive
Host: www.inet-telecom.com
Pragma: no-cache
User-Agent: Mozilla/5.0 (Windows NT 10.0; WOW64) AppleWebKit/537.36 (KHTML, like Gecko) Chrome/55.0.2883.75 Safari/537.36
The data below this is binary data containing the real WireGuard traffic.
The fact that you exchange HTTP data with the VPN server on the VPN port shows that the obfuscation is working effectively.
How to verify the WireGuard tunnel is using a post-quantum resistant encryption?
In this scenario, you will learn how to verify that your WireGuard VPN is using a post-quantum resistant encryption. You will not need Wireshark as it is not possible to inspect the encrypted traffic to figure how resistant it is, instead, you will need to install the WireGuard tools. This program is compatible with all major operating systems.
In WireGuard, post-quantum resistance is achieved by using a pre-shared key (PSK) between the VPN client and VPN provider servers.
Once the installation is done, run the command wg with administrator privileges. This command will display the state of each active WireGuard connections. If you identify the pattern preshared key: (hidden) in the command output, it means there is a defined PSK. If there is no preshared key line, then the tunnel is not post-quantum resistant.
You can get access to the PSK with the command wg showconf INTERFACE_NAME, where INTERFACE_NAME is one of the interfaces reported in the previous command wg. If you can identify a line starting by PresharedKey, it means the PSK is configured and quantum resistant encryption enabled.
Decrypt the tunnel traffic with Wireshark
If you want to verify the network traffic passing through the WireGuard VPN tunnel, you do not need to decrypt the tunnel as you can use Wireshark directly on the VPN network interface.
However, based on Wireshark documentation, it should be possible to use the software to decrypt the WireGuard tunnel network traffic in real time with a specific setup. This requires access to the cryptographic keys used by the VPN client.
Next Articles
- Self audit your VPN - Pt1. - Getting started for the series
- Self audit your VPN - Pt3. - OpenVPN Configuration and Leaks
Here to learn?
Consult our guides for increasing your privacy and anonymity.
IVPN Privacy GuidesSuggest an edit on GitHub.